The Situation That Prompted Change
The monkey house (aka Cheeky Monkey Media) has been expanding a lot during the past few years. Our team has been growing. We’ve been working on more and larger projects, and we’ve been branching out to include more services.
As with any growth spurt, we’ve had to deal with a few growing pains.
The Challenge that Initiated Action: Lack of Consistent Working Environments
One of the things we noticed during this transition period was that we didn’t have have the best process for ensuring all developers were working in a consistent local environment. As a result, some developers were using MAMP, others XAMP or WAMP, others were even installing PHP and mysql separately.
Local environment (here) means that all of the developers have access to the exact same server apps and tools between each other, and that this set-up coincides with the way the website is set up in its live, production environment.
If your local environments aren’t set up to be consistent, you can end up with:
- Php versions not matching production specs and other devs’ local machines,
- Php or mysql configuration settings not being the same,
- Php libraries not being installed,
- Front end libraries being out of date or using different versions of ruby gems or node packages,
- Other services, like Solr or redis or an email server, etc., not running as they do on live version of the site.
t’s like you’re building one house, but each builder has his instance of the house set up differently and uses slightly different tools to build the house.
As you can imagine, this can get very problematic. You are likely to run into issues where the code works on dev environment A, but it doesn’t work on dev environment B. Or perhaps dev environment C gets a warning message, but dev environment A doesn’t. Or Sass can be compiled on dev environment B, but it’s giving a fatal error to dev environment D.
Every time, you run into this, you have to spend time and energy tracking down the compatibility problems, wasting valuable coding time, which leads to added stress and frustration, and reduces margins on a project.
And as everyone knows, time is bananas. We can’t have one bit of wasted banana peel lying around that isn’t being put to good profitable use.
Once we determined this, the task before us became clear: We needed to create a consistent working environment that matched the production environment in order to help new devs hit the ground running rather than getting caught in the mud.
Our overall objective was to increase productivity and enhance product quality.
The Goals
To help us achieve this, we set the following goals:
- Make it really easy to install a new environment.
- Make it easy to be able to run front end tasks (GRUNT build, etc).
- Mimic the live server exactly.
- Document and standardize (how to create a new config and how to use).
- Make sure our solution works on Mac and PC.
Step One: Research Options
Initial discussions led us to consider some of the technologies the monkeys had used before or had heard about. Before choosing a technology, however, we knew we needed to do some more research. At the end of this process, we had narrowed down the technologies we could use as part of our solution to the following 4 options:
- Drupal VM
- Vagrant
- Kalabox
- Docker
Drupal VM is basically a Vagrant box configured for a standard type drupal experience. Kalabox uses Docker and makes use of a lot of wrapping User Interface, which makes the process a lot less hands-on.
Kalabox is a great tool right out of the box, but is currently specifically setup to connect only to Pantheon hosted repos and environments.
We use Pantheon for most of our builds so that was a selling point. That said, we wanted to make sure that the solution we built, could integrate with any platform and wouldn’t be so dependent on only projects set-up on Pantheon.
In the end we decided to go with Docker as it’s lighter weight than Vagrant, which sets up individual VMs for each project. Docker, on the other hand, can share certain containers that you might reuse from project to project. We also chose it because, although fairly young, it already has full native apps out for Windows and Mac that make the installation of the engine a much easier process.
A Little Bit More About Docker
Docker has been in the technology spotlight for the last couple of years. Everyone is talking about it. For example, on February 11, 2016, Business Cloud News wrote:
Adoption of Docker’s containerisation technology has entered a period of explosive growth with its usage numbers nearly doubling in the last three months, according to its latest figures.
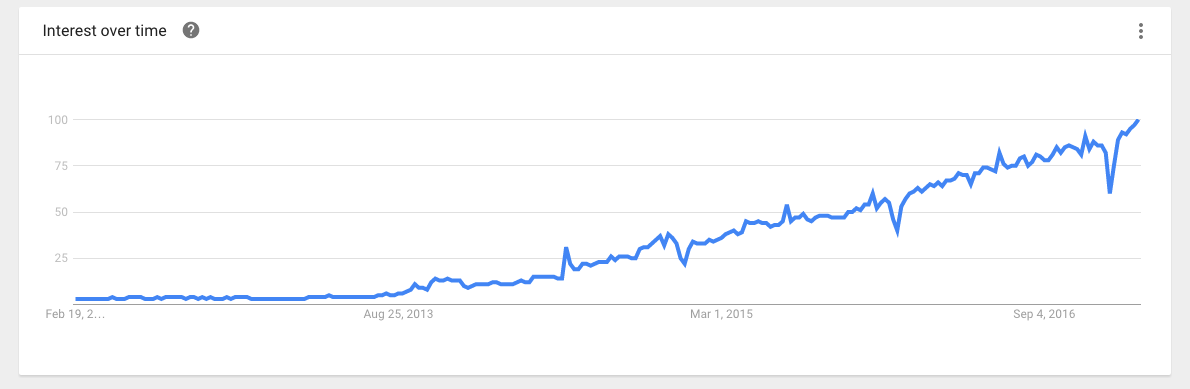
Similarly, Google Trends shows a significant increase in search term interest for “Docker” since 2013:
According to the official docker website:
Docker containers wrap a piece of software in a complete filesystem that contains everything needed to run: code, runtime, system tools, system libraries – anything that can be installed on a server. This guarantees that the software will always run the same, regardless of its environment.
In other words, Docker allows you to package up everything you might need to build a website in individual ‘containers’ so you can quickly load it up on your server. Since members of a team can all use the same Docker images, it means that you are all working in the same environment, using the same development dependencies.
Basic Docker Terminology
Docker image: an image contains single or multiple layers. For example, a solr image contains an ubuntu layer underneath. A docker image contains the tools, libraries, and software that your application needs to run.
Docker container: an instance of a docker image. For example, if you have a solr image, you can use this image to create multiple instance of image to run your indexing. Think about the image as the blueprint, and the containers as the products they create based on this blueprint.
Docker Compose: a tool for defining and running multi-container Docker applications. This is what you will use to define all the containers needed to run for a particular project. In the end, you will just run on docker compose command and it will download all the docker images and spin up the containers needed for the project.
You Chose the Technology… What Happened Next?
After we agreed on the technology, we got to the good stuff: monkey play.
Everyone on the team got a chance to get their hands dirty installing Docker, downloading images, building containers, and creating new images.
This was important because none of us had any experience with Docker previously, and we knew that we couldn’t just have one person learn Docker. We would need to have more than one person that could support this initiative for all of our projects and help tweak and setup new configurations. That meant we all needed to familiarize ourselves with it.
Moreover, as a developer, getting a chance to play with different systems and tools is an awesome opportunity to make ourselves more well rounded developers.
The First Docker Iteration
As we were exploring our options with Docker images, we started discussing what the standard process for new projects would look like and how we wanted to document that. We decided that we wanted to identify:
- Where the files we built would live?
- Where the Docker files would live?
- How we would import new data and files?
- How this process would transfer over to multiple projects, etc?
Docker Compose
The Docker engine can run as many docker images at the same time as your computer will allow with its resources. What Docker Compose does for us is it allows us to have 1 file that collects all of the images that we want to run together for a specific project.
All we need to do is:
- create a .yml file called docker-compose.yml
- specify each container that we would like docker to build
- indicate any specific settings that we would like to pass along to that particular image for setup or for specifying shared spaces and connections with other containers.
Here’s a little snippet to help illustrate:
services: </Users/kaidenmcfayden-faint/Documents/sites/cheekyinternal>
mariadb: </Users/kaidenmcfayden-faint/Documents/sites/cheekyinternal>
image: wodby/drupal-mariadb </Users/kaidenmcfayden-faint/Documents/sites/cheekyinternal>
environment: </Users/kaidenmcfayden-faint/Documents/sites/cheekyinternal>
MYSQL_RANDOM_ROOT_PASSWORD: 1 </Users/kaidenmcfayden-faint/Documents/sites/cheekyinternal>
MYSQL_DATABASE: drupal </Users/kaidenmcfayden-faint/Documents/sites/cheekyinternal>
MYSQL_USER: drupal </Users/kaidenmcfayden-faint/Documents/sites/cheekyinternal>
MYSQL_PASSWORD: drupal </Users/kaidenmcfayden-faint/Documents/sites/cheekyinternal>
php: </Users/kaidenmcfayden-faint/Documents/sites/cheekyinternal>
image: cheekymonkeymedia/jungle:7.0 </Users/kaidenmcfayden-faint/Documents/sites/cheekyinternal>
environment: </Users/kaidenmcfayden-faint/Documents/sites/cheekyinternal>
PHP_SITE_NAME: dev </Users/kaidenmcfayden-faint/Documents/sites/cheekyinternal>
PHP_HOST_NAME: localhost:8000 </Users/kaidenmcfayden-faint/Documents/sites/cheekyinternal>
volumes: </Users/kaidenmcfayden-faint/Documents/sites/cheekyinternal>
- ./:/var/www/html </Users/kaidenmcfayden-faint/Documents/sites/cheekyinternal>
We based our original docker-compose around a well thought out docker recipe that was specifically created for drupal: Docker4Drupal by Wodby.
Woodby’s docker-compose file comes with images for php, nginx, mariadb, phpmyadmin, mailhog and more. This setup ticked off a lot of our initial wants for our first release minus 1 big one: Front End Compiling.
One of our main goals identified in the “Consistent Local Environment” project was to make the front end compiling of our projects easier. At this point of our initial Docker iteration, we didn’t have that.
A Note On Front End Activities
One thing to note is that concurrent to this team working on a consistent local environment, we also had another team working on a more consistent front end build experience.
So, it was important to know what changes they wanted to make to our ‘normal’ front end process before we set about putting in the libraries needed to run the compiling.
Once we had this documented from the team working on a consistent front end build experience, we discovered that all we needed to support this new workflow beyond what we had initially, was to simply install the latest node js into our PHP container. But it turns out that it wasn’t that simple.
Trouble with Node-sass
The issue with node-sass involved the Linux distribution we used to build our Linux/PHP container.
The Docker4Drupal team had chosen Alpine because it’s a lightweight Linux distribution that seemed to be a good choice for Docker and after our research, we concurred.
But, apparently there was a downside.
Node-sass, an important front end library doesn’t currently support Alpine, and it was giving us build errors when we tried to Node Package Manager (npm) install our front end builds.
But, after some toiling with libraries and docker-compose build scripts, this bump in the road was finally smoothed out.
In the end we used Wodby’s php image as our base to work from but added to it the tweaks needed to be able to run node js inside. This php image, now named Jungle is also up on dockerhub for use by the community.
A Few Other Things We Learned
Along the way we also all got to learn a bit more about building custom images because we were also toying with the idea of building the container out of different Linux flavours like Ubuntu at that point too.
In addition, we got to play around with Kalabox as an alternative, which with our limited playing seems like a pretty good solution right out of the box, just FYI to all you Pantheon developers.
MVP (Minimum Viable Product) Specs
At the end of the day, what we ended up with:
- A configured docker environment that works well with a Pantheon server running Drupal 7 on PHP 5.6 on a frontend the complies with Cheeky Monkey’s new Torsion theme, which will also be available for download soon. The Jungle is available for download now.
- A new dev user experience that looks like this:
- Download Docker native app for windows or mac and install
- Clone the copy of our pantheon d7 docker compose build scripts
- Clone the copy of the pantheon repo Run ‘docker-compose up -d’ to start our containers
- Run easy commands to npm install inside the container for front end setup
- Ready to start coding
- Easy to use commands are pre-built so that you can run common tasks within the container like Gulp builds and watches, drush commands, etc
- We have containers for phpMyAdmin and an email client Mailhog for testing email sending
Next Steps
While we were happy with this initial product we had a few more needs and wants, including:
- Add on a Drupal 8 / php7 version
- Make sure we can use Xdebug in the container
- Make it work on Windows 10
- Support for projects using our old theme setup or just other front end setups in general
- Put our custom docker images on the docker hub ← Feel free to pull them, if needed
- Finalize our toolkit of helper scripts
- Add in support for solr
We will cover this in the next article.